نمایش NOTIFICATION ها
بسم الله الرحمن الرحیم
نمایش NOTIFICATION ها
فصل دوم-بخش دوازدهم
تا اینجا شما یاد گرفتید که با کلاس Toast یک پیغام را به کاربر نمایش می دهیم.
زمانی که یک پیغام را با استفاده از کلاس Toast به کاربر نمیاش داده می دادید دوام زیادی نداشت برای چند لحظه نمایش و بعد محو می شود. و اگر پیغام بسیار مهم باشد این میتواند برای کاربر مشکل ساز باشد.
برای پیغام های مهم که باید پایداری بیشتری داشته باشند شما می توانید از استفاده NotificationManager کنید که این یک پیغام در بالای گوشی نمایش داده می شود که بالای گوشی به عنوان status bar شناخته می شود گاهی اوقات هم به عنوان notificationbar شناخته می شود در ادامه آن را به یک مثال شرح می دهیم.
پروژه جدیدی به نام Notificationsایجاد کنید
یک کلاس جدید به نامNotificationView و یک فایل notification.xml در مسیرres/layout ایجاد کنید
فایل notification.xml را به صورت زیر تغیر دهید
<?xml version="1.0" encoding="utf-8"?>
<LinearLayout xmlns:android="http://schemas.android.com/apk/res/android"
android:orientation="vertical"
android:layout_width="fill_parent"
android:layout_height="fill_parent" >
<TextView
android:layout_width="fill_parent"
android:layout_height="wrap_content"
android:text="Here are the details for the notification..." />
</LinearLayout>
وکلای به نام NotificationView.java و دستورات زیر را در آن وارد کنید
package com.MehrdadJavidi.notifications;
import android.app.Activity;
import android.app.NotificationManager;
import android.os.Bundle;
public class NotificationView extends Activity
{
@Override
public void onCreate(Bundle savedInstanceState)
{
super.onCreate(savedInstanceState);
setContentView(R.layout.notification);
/**---look up the notification manager service---*/
NotificationManager nm = (NotificationManager)getSystemService(NOTIFICATION_SERVICE);
/**---cancel the notification that we started---*/
nm.cancel(getIntent().getExtras().getInt("notificationID"));
}
}
فایل AndroidManifest را به صورت زیر تغییر دهید.
<?xml version="1.0" encoding="utf-8"?>
<manifest xmlns:android="http://schemas.android.com/apk/res/android"
 package="com.MehrdadJavidi.notifications"
 android:versionCode="1"
 android:versionName="1.0" >
 <uses-sdk
 android:minSdkVersion="14"
 android:targetSdkVersion="14" />
<uses-permission android:name="android.permission.VIBRATE"/>
 <application
 android:allowBackup="true"
 android:icon="@drawable/ic_launcher"
 android:label="@string/app_name"
 android:theme="@style/AppTheme" >
 <activity
 android:name="com.MehrdadJavidi.notifications.MainActivity"
 android:label="@string/app_name" >
 <intent-filter>
 <action android:name="android.intent.action.MAIN" />
 <category android:name="android.intent.category.LAUNCHER" />
 </intent-filter>
 </activity>
 <activity android:name=".NotificationView"
android:label="Details of notification">
<intent-filter>
<action android:name="android.intent.action.MAIN" />
<category android:name="android.intent.category.DEFAULT" />
</intent-filter>
</activity>
 </application>
</manifest>
دستورات را در فایل main.xml وارد کنید
<?xml version="1.0" encoding="utf-8"?>
<LinearLayout xmlns:android="http://schemas.android.com/apk/res/android"
android:layout_width="fill_parent"
android:layout_height="fill_parent"
android:orientation="vertical" >
<Button
android:id="@+id/btn_displaynotif"
android:layout_width="fill_parent"
android:layout_height="wrap_content"
android:text="Display Notification"
android:onClick="onClick"/>
</LinearLayout>
دستورات زیر را د ر فایل mainActivyt.java وارد کنید.
package com.MehrdadJavidi.notifications;
import android.app.Activity;
import android.app.Notification;
import android.app.NotificationManager;
import android.app.PendingIntent;
import android.content.Intent;
import android.os.Bundle;
import android.view.View;
public class MainActivity extends Activity {
int notificationID = 1;
/** Called when the activity is first created. */
@Override
public void onCreate(Bundle savedInstanceState) {
super.onCreate(savedInstanceState);
setContentView(R.layout.main);
}
public void onClick(View view) {
displayNotification();
}
protected void displayNotification()
{
/**---PendingIntent to launch activity if the user selects*/
/** this notification---*/
Intent i = new Intent(this, NotificationView.class);
i.putExtra("notificationID", notificationID);
PendingIntent pendingIntent =
PendingIntent.getActivity(this, 0, i, 0);
NotificationManager nm = (NotificationManager)
getSystemService(NOTIFICATION_SERVICE);
Notification notif = new Notification(
R.drawable.ic_launcher,
"Reminder: Meeting starts in 5 minutes",
System.currentTimeMillis());
CharSequence from = "System Alarm";
CharSequence message = "Meeting with customer at 3pm...";
notif.setLatestEventInfo(this, from, message, pendingIntent);*/
/**---100ms delay, vibrate for 250ms, pause for 100 ms and*/
/**then vibrate for 500ms---*/
notif.vibrate = new long[] { 100, 250, 100, 500};
nm.notify(notificationID, notif);
}
}
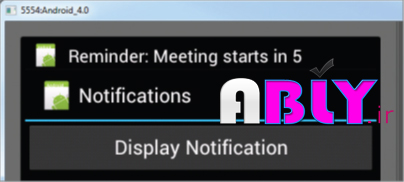
برنامه را f11 اجرا کنید بر روی دکمه Display Notifi cation کلیک کنید یک پیغام در status bar نمایش داده می شود
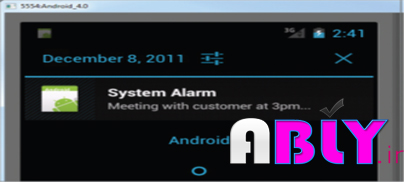
بر روی Status bar کلیک کنید و و انرا به پایین درگ کنید شما می توانید جزئیات بیشتری از پیغام را مشاهده کنید ما جزئیات بیشتری را با متد setLatestEventInfo() کلاس Notification تعیین کردید
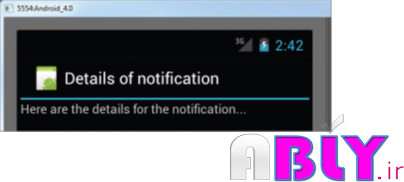
با کلیک بروی پیغام شما activity با نام NotificationView را مشاهده می کنید در این گونه موارد پیغام از status bar حذف می شود
توضیحات
برای نمیاش پیغام ها شما یک شی intent تعریف می کنید که اشاره به کلاس NotificationView دارد
این intent برای اجرای activity دیگر زمانی که کاربر بر روی یک از از پیغام ها کلیک کرد استفاده می شود. در اینجا شما یک جفت از name/value برای شی Intent استفاده کردید که این Notification Id ها برای حذف از notification ها استفاده می شود.
شما همچنین یک شی PendingIntent استفاده کرده اید که به شما کمک می کند تا یک عملیات را در برنامه استفاده کنید. صرف نظر از اینکه برنامه شما اجرا است یا خیر . در این موارد شما از مقدار دهی های زیر استفاده کرده اید.
PendingIntent pendingIntent =
PendingIntent.getActivity(this, 0, i, 0);
متد getActivity() از PendingIntent دارای پارامتر های زیر می باشد
- context: Context برنامه
- request code : کد درخواست برای intent
- intent: یک intent برای اجرای activity نظر
- fl ags: تعیین می کند activity که باید اجرا شود
شما از کلاس NotificationManager برا ی ایجاد یک شی Notification استفاده کردید
NotificationManager nm = (NotificationManager)
getSystemService(NOTIFICATION_SERVICE);
Notification notif = new Notification(
R.drawable.ic_launcher,
"Reminder: Meeting starts in 5 minutes",
System.currentTimeMillis());
کلاس Notification شما را قادر می سازد که اطلاعات اصلی پیغام را که در status bar می آید را تعیین کنید. دومین پارامتر سازنده متن پیغام را تعیین می کند
بعد شما برای تعیین جزئیات پیام از متد setLatestEventInfo() استفاده کرده اید
harSequence from = "System Alarm";
CharSequence message = "Meeting with customer at 3pm...";
notif.setLatestEventInfo(this, from, message, pendingIntent);
/**---100ms delay, vibrate for 250ms, pause for 100 ms and*/
/** then vibrate for 500ms---*/
notif.vibrate = new long[] { 100, 250, 100, 500};
همچنین شما تعیین کرده ایدد که زمانی که پیغام نمایش داده می شود ویبره گوشی فعال شود این کار را با استفاده از متد notify() تعیین کرده اید
nm.notify(notificationID, notif);زمانی که کاربرد بر روی یک پیغام کلیک میکند activity NotificationView اجرا می شود در این جا شما پیغام را حذف می کنید با استفاده از از متد cancel() از شی NotificationManager که یک Id ی پیغام مورد نظر را دریاف میکند . که از طرق شی Intent ارسال شده است
otificationManager nm = (NotificationManager)
getSystemService(NOTIFICATION_SERVICE);
/**---cancel the notification that we started---*/
nm.cancel(getIntent().getExtras().getInt("notificationID"));


