SOCKETS PROGRAMMING در اندروید
بسم الله الرحمن الرحیم
SOCKETS PROGRAMMING در اندروید
فصل دهم-بخش دوم
تا اینجا شما یاد گرفتید که چگونه وب سرویس ها xmlو json را اجرا کنید
اگر شما بخواهدی که برنامه شما به یک server متصل شود و پیغام های ارسال و دریافت کنید شما به تکنولوژی برنامه نویسی نیار دارید که به عنوان شناختهSocket Programming می شود. Socket Programming یک تکنولوژی میباشد که به شما امکان اتصال بین serverو Client را می دهید. در ادامه به شما شرح میدهیم که چگونه می توانید چگونه یک برنامه چت اندروید ایجاد کنید که از طریق از طرق socket استفاده می شود. چندین برنامه می توانند به سرور وصل شده و باهم چت کنند.
پروژه جدیدی به نامSockets. ایجاد کنید
فایل AndroidManifest.xml به صورت زیر تغیر دهید
<?xml version="1.0" encoding="utf-8"?>
<manifest xmlns:android="http://schemas.android.com/apk/res/android"
 package="com.MehrdadJavidi.sockets"
 android:versionCode="1"
 android:versionName="1.0" >
 <uses-sdk android:minSdkVersion="14" />
 <uses-permission android:name="android.permission.INTERNET" />
 <application
 android:icon="@drawable/ic_launcher"
 android:label="@string/app_name" >
 <activity
 android:name=".MainActivity"
 android:label="@string/app_name" >
 <intent-filter>
 <action android:name="android.intent.action.MAIN" />
 <category android:name="android.intent.category.LAUNCHER" />
 </intent-filter>
 </activity>
 </application>
 </manifest>
و دستورات زیر را در فایلmain.xml اضافه کنید
<?xml version="1.0" encoding="utf-8"?>
<LinearLayout xmlns:android="http://schemas.android.com/apk/res/android"
 android:layout_width="fill_parent"
 android:layout_height="fill_parent"
 android:orientation="vertical" >
 <EditText
 android:id="@+id/txtMessage"
 android:layout_width="fill_parent"
 android:layout_height="wrap_content" />
 <Button
 android:layout_width="fill_parent"
 android:layout_height="wrap_content"
 android:onClick="onClickSend"
 android:text="Send Message" />
 <TextView
 android:id="@+id/txtMessagesReceived"
 android:layout_width="fill_parent"
 android:layout_height="200dp"
 android:scrollbars="vertical" />
</LinearLayout>
یک کلاس به نامCommsThread. ایجاد کنید و دستورات زیر را در آن وارد کنید
package com.MehrdadJavidi.sockets;
import java.io.IOException;
import java.io.InputStream;
import java.io.OutputStream;
import java.net.Socket;
import android.util.Log;
public class CommsThread extends Thread {
 private final Socket socket;
 private final InputStream inputStream;
 private final OutputStream outputStream;
 public CommsThread(Socket sock) {
 socket = sock;
 InputStream tmpIn = null;
 OutputStream tmpOut = null;
 try {
 // ---creates the inputstream and outputstream objects
 // for reading and writing through the sockets---
 tmpIn = socket.getInputStream();
 tmpOut = socket.getOutputStream();
 } catch (IOException e) {
 Log.d("SocketChat", e.getLocalizedMessage());
 }
 inputStream = tmpIn;
 outputStream = tmpOut;
 }
 public void run() {
 // ---buffer store for the stream---
 byte[] buffer = new byte[1024];
 // ---bytes returned from read()---
 int bytes;
 // ---keep listening to the InputStream until an
 // exception occurs---
 while (true) {
 try {
 // ---read from the inputStream---
 bytes = inputStream.read(buffer);
 // ---update the main activity UI---
 MainActivity.UIupdater.obtainMessage(0, bytes, -1, buffer)
 .sendToTarget();
 } catch (IOException e) {
 break;
 }
 }
 }
 // ---call this from the main activity to
 // send data to the remote device---
 public void write(byte[] bytes) {
 try {
 outputStream.write(bytes);
 } catch (IOException e) {
 }
 }
 // ---call this from the main activity to
 // shutdown the connection---
 public void cancel() {
 try {
 socket.close();
 } catch (IOException e) {
 }
 }
}
}
دستورات زیر را در SocketsActivity.javaوارد نمایید
package com.MehrdadJavidi.sockets;
import java.io.IOException;
import java.net.InetAddress;
import java.net.Socket;
import java.net.UnknownHostException;
import android.app.Activity;
import android.os.AsyncTask;
import android.os.Bundle;
import android.os.Handler;
import android.os.Message;
import android.view.View;
import android.widget.EditText;
import android.widget.TextView;
import android.util.Log;
public class MainActivity extends Activity {
 static final String NICKNAME = "Mehrdad Javidi";
 InetAddress serverAddress;
 Socket socket;
 // ---all the Views---
 static TextView txtMessagesReceived;
 EditText txtMessage;
 // ---thread for communicating on the socket---
 CommsThread commsThread;
 // ---used for updating the UI on the main activity---
 static Handler UIupdater = new Handler() {
 @Override
 public void handleMessage(Message msg) {
 int numOfBytesReceived = msg.arg1;
 byte[] buffer = (byte[]) msg.obj;
 // ---convert the entire byte array to string---
 String strReceived = new String(buffer);
 // ---extract only the actual string received---
 strReceived = strReceived.substring(0, numOfBytesReceived);
 // ---display the text received on the TextView---
 txtMessagesReceived.setText(txtMessagesReceived.getText()
 .toString() + strReceived);
 }
 };
 private class CreateCommThreadTask extends AsyncTask<Void, Integer, Void> {
 @Override
 protected Void doInBackground(Void... params) {
 try {
 // ---create a socket---
 serverAddress = InetAddress.getByName("192.168.1.102");
 // --remember to change the IP address above to match your own--
 socket = new Socket(serverAddress, 500);
 commsThread = new CommsThread(socket);
 commsThread.start();
 // ---sign in for the user; sends the nick name---
 sendToServer(NICKNAME);
 } catch (UnknownHostException e) {
 Log.d("Sockets", e.getLocalizedMessage());
 } catch (IOException e) {
 Log.d("Sockets", e.getLocalizedMessage());
 }
 return null;
 }
 }
 private class WriteToServerTask extends AsyncTask<byte[], Void, Void> {
 protected Void doInBackground(byte[]... data) {
 commsThread.write(data[0]);
 return null;
 }
 }
 private class CloseSocketTask extends AsyncTask<Void, Void, Void> {
 @Override
 protected Void doInBackground(Void... params) {
 try {
 socket.close();
 } catch (IOException e) {
 Log.d("Sockets", e.getLocalizedMessage());
 }
 return null;
 }
 }
 /** Called when the activity is first created. */
 @Override
 public void onCreate(Bundle savedInstanceState) {
 super.onCreate(savedInstanceState);
 setContentView(R.layout.activity_main);
 // ---get the views---
 txtMessage = (EditText) findViewById(R.id.txtMessage);
 txtMessagesReceived = (TextView) findViewById(R.id.txtMessagesReceived);
 }
 public void onClickSend(View view) {
 // ---send the message to the server---
 sendToServer(txtMessage.getText().toString());
 }
 private void sendToServer(String message) {
 byte[] theByteArray = message.getBytes();
 new WriteToServerTask().execute(theByteArray);
 }
 @Override
 public void onResume() {
 super.onResume();
 new CreateCommThreadTask().execute();
 }
 @Override
 public void onPause() {
 super.onPause();
 new CloseSocketTask().execute();
 }
}
برای تست برنامه شما باید از فایل ![]() server.exe استفاده کنید.
server.exe استفاده کنید.
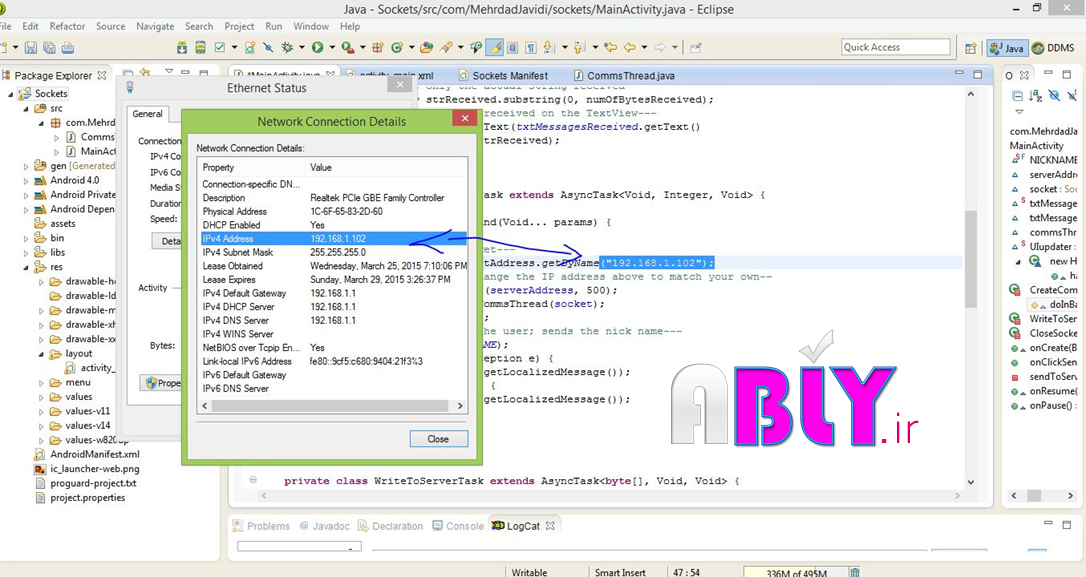
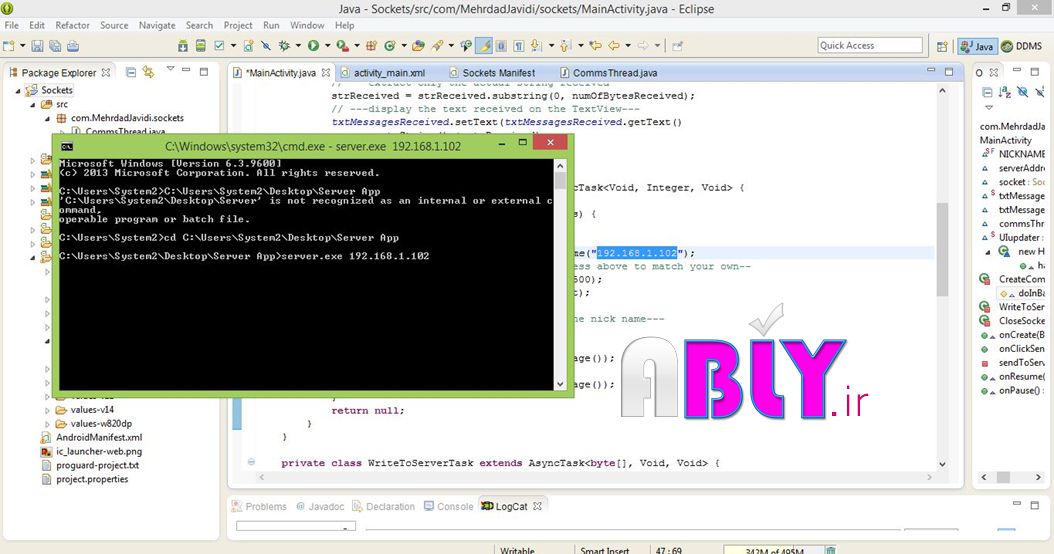
این برنامه می تواند چندبن کاربر به به برنامه وصل شده و سپس پیام های دریافتی را به تمام کلاینت های وصل شده ارسال کنند.. برای اجرای سرور به cmd رفته و دستور زیر را وارد کنند. C:\>Server.exe Your_IP_Address
به عنوان مثال اگر ip شما 192.168.1.102میباشد دستور به صورت زیر می باشد.
C:\>Server.exe 192.168.1.102
قبل از اینکه شما برنامه را بر روی دستگاه واقعی اجرا کنید. مطئن شوید که دستگاه به شبکه یکسان متصل هستند. به عبارتی دیگر کامپیوتر به یک شبکه wireless router وصل می شوند و دیگر وسایل هم به آن و صل می شوند.
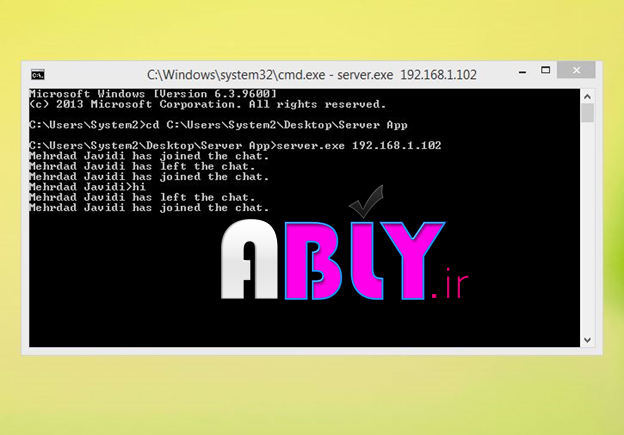
برنامه را اجرا کنید برنامه را اجرا کنید و متن را وارد و سپس بر روی دکمه Send Message کلیک کنید
همان طور که می بینید پیام ارسال شده دریافت می شود.
توضیحات
برای کنترل پیچیدگی ها ی ارتباط های سوکتی. شما یک کلاس جدا به نامCommsThread ایجاد کردید این کلاس از کلاسThread مشتق شده است که تمام ارتبایاط سوکتی می تواندد در Thrad های مختلفی اجرا شوند. جدا از Thread مربوط به UI.
public class CommsThread extends Thread {
}
در کلاس شما سه شی تعریف کردید.
private final Socket socket;
private final InputStream inputStream;
private final OutputStream outputStream;
اولین آنها شی socket می باشد. که سوکت TCP سمت کاربر را فراهنم می آورد. وشی InputStreamبه شما کمک می کند تا داده ها را از ارتباط های سوکت بخوانید. وشیOutputStream به شما کمک می کند تا داده ها را در ارتباطات سوکت بنویسید
سازنده برای کلاس CommsThread یک شی از SOCKET را دریافت می کند. و بع از آن سعی میکند که شی های InputStream and OutputStream را بدست آورد
public CommsThread(Socket sock) {
 socket = sock;
 InputStream tmpIn = null;
 OutputStream tmpOut = null;
 try {
 // ---creates the inputstream and outputstream objects
 // for reading and writing through the sockets---
 tmpIn = socket.getInputStream();
 tmpOut = socket.getOutputStream();
 } catch (IOException e) {
 Log.d("SocketChat", e.getLocalizedMessage());
 }
 inputStream = tmpIn;
 outputStream = tmpOut;
 }
متدrun به ارتباط گوش می دهد برای آمدن دادهها و خواند آنها توسط شی InputStream.زمانی که داده ها دریافت شد سپس UI مربوط به activity را بعه روز رسانی می کند و پیام را که شامل داده های دریافتی می باشد به آن ارسال می کند.
 public void run() {
 // ---buffer store for the stream---
 byte[] buffer = new byte[1024];
 // ---bytes returned from read()---
 int bytes;
 // ---keep listening to the InputStream until an
 // exception occurs---
 while (true) {
 try {
 // ---read from the inputStream---
 bytes = inputStream.read(buffer);
 // ---update the main activity UI---
 MainActivity.UIupdater.obtainMessage(0, bytes, -1, buffer)
 .sendToTarget();
 } catch (IOException e) {
 break;
 }
 }
 }
متد write به شما کمک می کند تا داده هار ا در ارتباط socket بنویسید
//---call this from the main activity to
// send data to the remote device---
 public void write(byte[] bytes) {
 try {
 outputStream.write(bytes);
 } catch (IOException e) {
 }
 }
و متد cancel ارتباط سوکت را قطع می کند
public void cancel() {
 try {
 socket.close();
 } catch (IOException e) {
 }
 }
در فایل SocketsActivity.java شما 3 زیر کلاس ایجاد کردید که از کلاس AsyncTask مشتق شده اند
private class CreateCommThreadTask extends AsyncTask<Void, Integer, Void> {
 @Override
 protected Void doInBackground(Void... params) {
 try {
 // ---create a socket---
 serverAddress = InetAddress.getByName("192.168.1.102");
 // --remember to change the IP address above to match your own--
 socket = new Socket(serverAddress, 500);
 commsThread = new CommsThread(socket);
 commsThread.start();
 // ---sign in for the user; sends the nick name---
 sendToServer(NICKNAME);
 } catch (UnknownHostException e) {
 Log.d("Sockets", e.getLocalizedMessage());
 } catch (IOException e) {
 Log.d("Sockets", e.getLocalizedMessage());
 }
 return null;
 }
 }
private class WriteToServerTask extends AsyncTask<byte[], Void, Void> {
 protected Void doInBackground(byte[]... data) {
 commsThread.write(data[0]);
 return null;
 }
 }
 private class CloseSocketTask extends AsyncTask<Void, Void, Void> {
 @Override
 protected Void doInBackground(Void... params) {
 try {
 socket.close();
 } catch (IOException e) {
 Log.d("Sockets", e.getLocalizedMessage());
 }
 return null;
 }
 }
کلاس CreateCommThreadTaskکه همزمان می باشد می باشد یک ارتباط با سرور بر قرار می کند.
برای سوکت سرور, اولین متن ارسال شده توسط کلاینت بعد از ارتباط انجام شده به عنوان نام مستعار برای کلاینت در نظر گرفته می شود.
از این رو زمانی که ارتباط بر قرار شد شما بل فاصله یک پیام به سرور ارسال می کنید که در بر گیرند نام مستعاری برای کلاینت می باشد.
sendToServer(txtMessage.getText().toString());
کلاسWriteToServerTask به شما امکان می دهد تا داده ها را به صورت همرمان ارسال کنید و درحای کلاس CloseSocketTask ارتباط را قطع میکند و متد sendToServer() یک متن را دریافت و به byte تبدیل می کند. و سپس متدexecute() از کلاس WriteToServerTaskرا برای ارسال داده ها به صورت همزمانی فراخوانی می کند.
private void sendToServer(String message) {
 byte[] theByteArray = message.getBytes();
 new WriteToServerTask().execute(theByteArray);
 }
ودر آخر هم زمانی که Activyt به حالت paused, می رود ارتباط سوکت قطع می شود. وزمانی که دوباره resumed, می شود ارتباط ایجاد می شود
@Override
 public void onResume() {
 super.onResume();
 new CreateCommThreadTask().execute();
 }
 @Override
 public void onPause() {
 super.onPause();
 new CloseSocketTask().execute();
 }

